

Clear the Icon Clutter
By Pat Tyler, Computer Enthusiast
Those desktop short cut icons come in handy, especially if you use a lot of software programs on your computer. But if you leave more than a few on the desktop, they become disorganized clutter that is distracting to say the least. If you are a fan of scenic wallpaper, the icons become a confusing mess that often seems to hide the one you want.Why not organize them into topical groups, move them to your own menu system, and banish all but a few favorites from the desktop. This works with Microsoft Windows XP, 7, and 8. Presumably it will work with any versions that fall in between.
You'll find the process simple once you understand that it just involves making some folders and dragging the icons into your new folders. If you are comfortable with navigating your hard disk file system with Windows Explorer and making new folders, you can probably get this done by simply using the instructions in bold-italic embedded in the longer descriptions below.
- Open Windows Explorer by double-clicking the Computer icon or, click the Explorer icon. (I keep mine pinned to the task bar on both my Windows 7 desktop and my Windows 8 laptop.) The Task bar is that bar that extends across the bottom of you desktop screen to notify you of the tasks that are presently open and ready to use. (See icon images.)
- With Windows Explorer navigate to your Documents folder. (Click "Documents" in the Explorer menu in the left pane.)(See Explorer menu image.)
- Make new folder: Now, Right-Click Documents in Explorer, and on the pop-up context menu select New then select Folder. This will put a new unnamed folder in your Documents folder.You should be able to see the new folder with it's folder icon. It will have the name New folder.(See Context menu New Folder image.)
- Name your Menu: Right-click the name New folder and select Rename. This will highlight the name so that you can replace that name with one that you like for your new menu system. I have named the one on my computer "My Links." Your's could be My Links or My Icons, My Programs or whatever you like. The word "My" is not necessary to make this work. And, you can rename this folder if you decide on a different name later.(See Context menu Rename image.)
- Click on your newly named folder to give it focus in the right pane of the Explorer window. Now you are ready to make sub-folders for the categories of icons stored on your desktop. If you have organized your icons into topical groups, here is where you will use the names of those groups.
- Right-click in the empty Explorer right window pane. Choose New | Folder. You should be able to type in the name of this folder as it is created. If you miss the opportunity, just right-click New folder and proceed with your naming process. Repeat this step for each category of your icons.
- Clear your desktop of all windows except that holding Explorer and your new set of folders. Be sure you are not in full screen mode. You must be able to see the icons you will move into your new folders. Your Menu folder should be in the left window pane of explorer, and your category folders in the right pane. Drag your icons into the appropriate category folders.
There are a couple of ways to get the short cut icons in their folders. One is to drag them to the category folder names, the other is to click the folder name to open it in the right pane, then drag all the appropriate icons to that one. Then open the next folder and repeat, until you have moved all of your icons.
Actually this process on the desktop will put copies of your icons (short cuts) in the category folders instead of actually moving them, so, once you have verified that they are safely in your new folders, you will need to delete them from the desktop. Do verify that you have them where you want them first. - We're nearly there! Now we'll put your new menu on the task bar. Right-click on the task bar, and select Toolbars, then New Toolbar... A Copy of Explorer will popup. Click Documents in the left window pane. Navigate to your new menu folder, My Links or whatever your named yours. That does it!
- You should see your new menu as the first item on the right side of your task bar, like this:
To access your new short cut menu, press the double arrow >> next to the name.


Then click to open the category of your choice. All your short cuts will be organized, accessible, and out of sight. You can make any changes at any time.
Illustrations
| Step 1 | Step 2 | Step 3 | Step 4 |
Folders (Back to Step 1.) |
Windows Explorer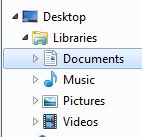 (Back to Step 2.) |
 (Back to Step 3.) |
 (Back to Step 4.) |
Hints
Folder Names: You can precede the folder name with an exclamation point "!" to make it appear first in the alphabetical display in Explorer. e.g. !My Links. (Two !! precedes one !, and three !!! precedes two !!.) It all has to do with character order on the ASCII table. A whole lot of characters precede those of the alphabet. You can see an ASCII table and the character order at http://www.asciitable.com/.Drag: Put your cursor over the object to be moved. Press the left mouse button and move the object with the mouse to the new location, then release the left mouse button.