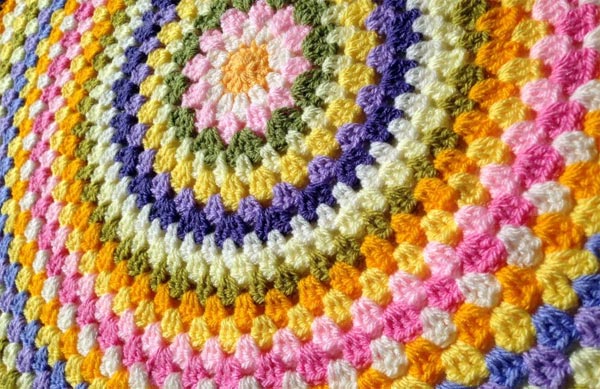
Crochet a Flat Disk
Here's How:
1. Start with the right number of stitches.
You must have the right number of starting stitches in your first round. Too many stitches and you make waves; too few and you have a bowl.Generally, the taller the stitch, the more stitches you need to start with round 1.
- Single crochet: Use 6-8 stitches in round 1.
- Half double crochet: Use 10 stitches in round 1.
- Double crochet: Use 12-14 stitches in round 1.
2. Increase with Precision
To make your circle grow just enough without getting too big around the edge, you need to follow some basic rules about how many times to increase as your work each round. Luckily, these rules are the same whether you are making a crochet circle using SC, HDC or DC stitches. Only one set of rules to remember for all circles!Note that you must start with the recommended number of stitches in round 1 for this to work.
The Increase Pattern For All Circles
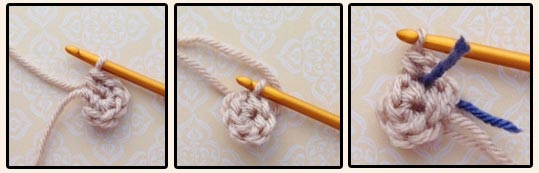
- Round 1: Start with a magic loop, then proceed with the recommended number of stitches listed above.
- Round 2: Make two stitches into each stitch of round 1.
- Round 3: Make two stitches into the first stitch of the previous round, one stitch into the next. Repeat this pattern. This is an increase into every other stitch.
- Round 4: Make two stitches into the first stitch of the previous round, then one stitch into the next two stitches. Repeat all the way around. That's an increase every third stitch.
- Round 5: Make two stitches into the first stitch, then one stitch into the next three stitches. Repeat this pattern. This is an increase into every fourth stitch.
- Subsequent Rounds: Continue to increase on the first stitch and then put one more single stitch between the increases with each additional round. For example: By round 10, you would make eight single stitches between the increases. Continue in this manner until the piece is the desired diameter.
3. COUNT, COUNT, COUNT Those Stitches
An easy to make sure you are on trach in each round is to count your stitches. Each round should increase by the same number you started with in round 1.Example:
- Round 1:Start with 13 dc you will add 13 stitches each additional round. The stitch count for rounds 2-6 should be as follows.
- Round 2: 26 (13 + 13)
- Round 3: 39 (26 + 13)
- Round 4: 52 (39 + 13)
- Round 5: 65 (52 + 13)
- Round 6: 78 (65 + 13)
4. Say YES to Seamless Joining
No matter how hard you try, if you close each round with a slip stitch and start the next with three chains, you get a not-so-pretty seam.Try this instead:
- When you finish the final dc in any round of the cricle, cut the yarn and pull it through the stitch.
- Thread it into a darning needle and sew it through both loops of the first stitch of the round, but don't pull it tight yet.
- Bring the needle and tail end back to the front of your work and sew it between the front and back loop of the last dc of the round.
- As you pull close, you will see a figure eight shape in the yarn just before it closes. Adjust the tension slightly and you should have a seemless join.
- Start the next round with a standing stitch dc. To do this, hold the new yarn to the back of your work, put the yarn around the hook twice, insert the hook into the next stitch, yarn around the hook and pull through. You will now have three loops on the hook. You can now complete a dc as usual. Take care to crochet over your tail end to secure it.

5. Learn the Amigurumi Technique
In amigurumi crochet, single crochet stitches are worked in a spiral to achieve a seamless join, even when the entire circle is made in one color. See the short tutorial below:Step 1:
Make a magic loop and crochet eight sc into the loop. Then, instead of joining with a slip stitch, crochet the first stitch of round two into the top of the first stitch of round one.
Step 2:
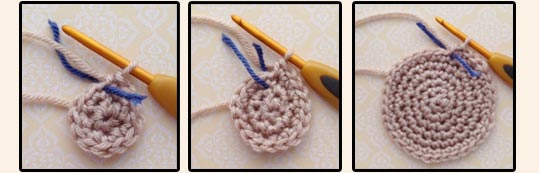
By the end of round 6 (shown above right) you can see the spiral effect more clearly and how flat the circle remains.
6. If Things Go Wrong, Act Fast!
Although the first five hacks will give you perfect, flat circles 95 percent of the time, you still need to be prepared to be a little creative and flexible if things start to go wrong.Everyone's crochet tension is different, and changing your hook size slightly, using an unusual yarn or just losing your concentration could derail your circle. This last trick will help you recognize these signs early so you can avoid re-doing too much work.
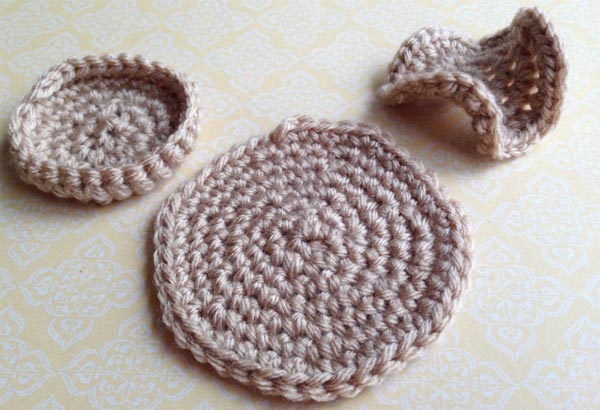
The Potato Chip
Compared to the flat circle in the center, the one at the top right looks super ruffled — the potato chip effect. This is what happens if you have too many stitches around the outside of your growing circle. In this example, rounds 1 and 2 are correct, but the rest of the rounds still include an increase in every stitch. The result tells you why amigurumi can be used to to crochet food!If your circle shows signs of ruffling, try pulling back a couple of rounds and skip a round. For example, pull back to round 4 and then crochet round 6 instead of round 5 before carrying on. That may be enough to solve the problem.
The Bowl
The example on the top left shows what happens if you complete rounds 1 and 2 correctly and then continue without increasing at all. The sides will curl up. This is exactly what you want if you are making a bowl or basket — but you need to be in control of when it happens.If your circle edges start to rise up, try repeating the round you have just finished. For example, if you are on round 5, work another round 5 before going on.