5 Primitive Shapes
by Tamara Kelly www.mooglyblog.com
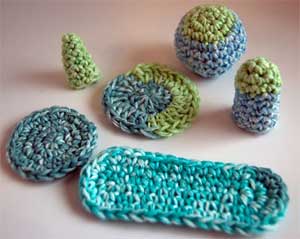
5 Primitive Shapes
The sculptural qualities of crochet are amazing! With crochet, any shape is possible — you can take off in any direction, add or subtract any stitches you like, go wild! That said, there are several basic shapes most crocheters will eventually use, beyond the straight line. These shapes are the building blocks of hats, bags, toys, amigurumi, finger puppets, and so much more. So let's round five of them up today and pin them all down in one place!
1. Circles
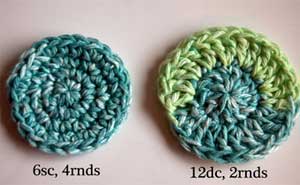
Circles
- Work X sts into the center.
- Work 2 sts into each st of the previous round.
- Work *1 st into the next st, then 2 sts into the next st* repeating around.
- Work *1 st into the next 2 sts, then 2 sts into the next st* repeating around.
- Work *1 st into the next 3 sts, then 2 sts into the next st* repeating around.
- Continue adding another st before increasing in each round, until desired size is achieved.
2. Spheres
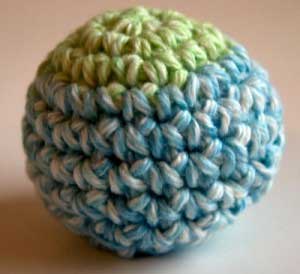
Spheres
3. Ovals
Ovals
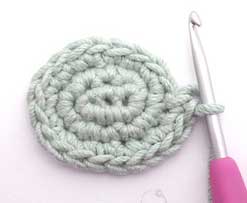
Ovals
Tutorial:
Before starting, you should already know some crochet basics, such as chains, single crochet, and how to crochet in the round.Abbreviations:
ch = chain
sc = single crochet
This crochet shape is made by crocheting in a spiral, without joining the rounds.
Start
Note: Your chain should be very tight, or you'll end up with holes in the middle. If necessary, work the starting chain with a smaller hook, then change back to the normal size for the rest of your project.| Round 1 | |||
|---|---|---|---|
 Chain 4 Chain 4 to start. |
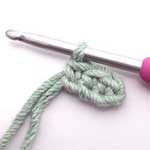 Rnd 1 sc Sc in 2nd ch from hook, and in each of the next 2 chains (3 sc). |
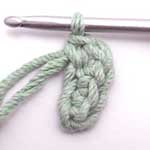 Rnd 1: Rounding the end Work 2 more sc in the same space as the last sc (now you have 3 sc in the last chain). |
|
 Rnd 1: Completing the Round Rotate the piece so that you can work back down foundation chain. Sc in the next space (the bottom of the 2nd sc that you made). 2 sc in the same space as the very first sc. | |||
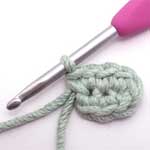
| Round 2 | 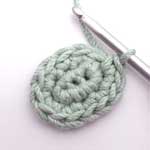 Rnd 2: the complete round 2 sc in the first sc of the previous round. Sc in next sc. 2 sc in each of the next 3 sc. Sc in next sc. 2 sc in each of the next 2 sc. (14 sc) |
||
| Round 3 | |||
|
2 sc in first sc from previous round, 1 sc in next sc. Sc in next st. (2sc in next sc, 1 sc in next sc) 3 times. 1 sc in next st. (2 sc in next sc, 1 sc in next sc) 2 times. (20 sc) You can add more rounds to make the oval bigger. Increase by 3 stitches at each end of the oval, while keeping the stitches in the middle of the oval flat. Continue this way until you have the right size. To make a longer oval, start with a longer chain. You'll still increase by three stitches at each end, but there will be more flat stitches in the middle part of the oval. For a more even-looking oval, you can join each round with a slip stitch, and chain one before continuing with the next round. |
|||
4. Cones
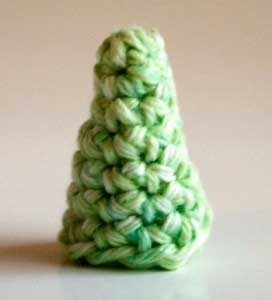
Cones
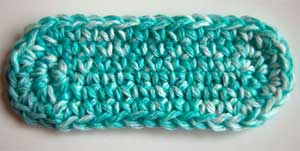
5. Cylinders
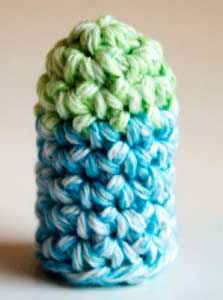
Cylinders
- Work the desired number of stitches in a magic circle.
- Work standard circle increase rows until desired width is achieved.
- Work even until desired length is achieved.
With these five basic shapes you are ready to tackle all kinds of projects! Even design your own! I hope having them all in one place will make it easier for you too. And you can look for some great patterns using the cylinder in the coming weeks! How will you use these shapes? Let me know in the comments!